
This article is a companion piece to my talk at WordCamp Sacramento 2016 of the same title.
The WordPress Customizer became included into core in version 3.4. Over the years it has seen many improvements to use and functionality. It is a tool for previewing changes to your site before you commit them. For new users the most common uses are for the Site’s name and Description. Adjusting colors and managing Menu’s and Widgets are also popular. The default WordPress Customizer has many useful settings and the ability to add and even create our own makes the future exciting.
What is the Customizer?
As I prepared to give this talk at WordCamp Sacramento 2016 it surprised me how many times people asked this question. Many of the attendees and other WordCamp Speakers had no experience using the Customizer, even the default settings in core.
After hearing this I put together the following clip to open my talk. It shows the interface and some examples of things the Customizer can do. Changing the title or description of the site, changing colors, reordering widgets, etc.
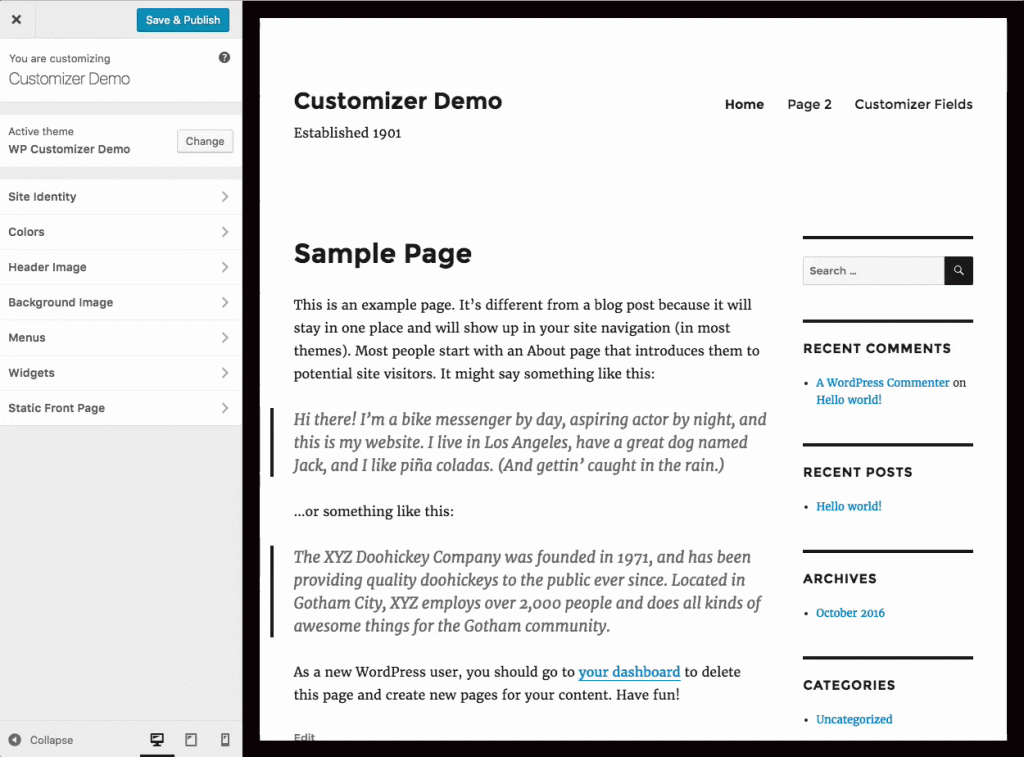
Accessing the Customizer is easier than ever. You can get to it via the dashboard under the Appearance section. Or while logged in and browsing the site the Customize button appears next to the Dashboard button in the admin bar. When you use this link you’ll open the Customizer and preview the page that you were currently on.
The Customizer is everything
At last years inagural WordCamp US Matt Mullenweg talked about the Customizer and his view of it’s importance. He said customization is the biggest opportunity for improving new user experience. During this summer Jeff Chandler from WP Tavern asked Matt to expand on this. Here’s an excerpt from that interview:
Jeff Chanler –
At WordCamp US you said that Customization is the single biggest opportunity for improving the WordPress experience, and I wanted to know, could you expand on this? And how important is the Customizer in this regard?Matt Mullenweg –
The Customizer is everything.JC –
Really?MM –
Yeah. You know, I think that the Customizer is definitely, like if I think about leading a release, I could see the Customizer being a main focus of it. You know? That, it’s so important to the user experience of someone new to WordPress especially, but also to everyone who uses WordPress day to day, and it’s also probably our weakest area to be honest. I mean, it’s had a ton of work, it’s so much better than it was, but if you just look at like we’re only as strong as our weakest link, and right now I think our weakest link in user experience is the customization—it’s not just the Customizer it’s also themes—but the customization of the frontend of someone’s site
Here is the link to the entire podcast.
At the end he hints at the need for customization on the front-end. I think this is the direction that the Customizer is heading, but more on that later.
Getting Started With The Customizer
To make any changes or additions to the Customizer we use the customize_register hook.
function themeslug_customize_register( $wp_customize ) {
  // Add/Get/Remove Customizer Settings
}
add_action( 'customize_register', 'themeslug_customize_register' );
The function you hook in needs to include the $wp_customize argument as this is the WordPress Customize Manager object. This bootstraps the WordPress Customizer experience and serves as the factory to create controls and settings.
It’s best practice to create this function in a customize.php file that you have an an /inc/ folder of your theme/plugin. But there is no requirement to use the Customizer other than using the aforementioned hook.
There are four main Customizer objects that you will access from the Customize Manager: Panels, Sections, Settings, and Controls. Each Object has three methods, add, get, and remove, that you use to make any changes.
Panels are the highest level of hierarchy and hold one or more sections.
Sections hold one or more setting and will not display until there is at least one setting. Panels wont display until one of their sections has a setting.
Setting and Controls are dependent on each other. The Control is the user input and settings determine how that control saves to the database.
Remove
Within the function you can begin to make your changes to the Customizer. WordPress sets up several sections and panels by default. You can remove them if you don’t need them or want to recreate the functionality.
$wp_customize->remove_setting( 'blogname' );By accessing the Customize Manager and using remove_setting we can pass in an id of a section to remove it from the Customizer. You could remove a panel, setting, or control the same way.
Get
The Get method lets you change parameters that have already been set either through the defaults or one added by a parent theme. Here is an example of how TwentySixteen uses the get method.
$wp_customize->get_setting( 'blogname' )->transport = 'postMessage';
$wp_customize->get_setting( 'blogdescription' )->transport  = 'postMessage';
When you pass in an id the method returns the object you requested. Then you can access any of that objects properties. You could save this to a variable, or in this example change the value of the transport property to postMessage.
Adding to the Customizer
The add method is how we add our own panels, sections, settings and controls to the Customizer. Lets dive in to each one and look at the properties required.
Adding a Panel
$wp_customize->add_panel(
    'panel_id',
    array(
        'priority'   	   => 160,
        'title'      	   => __( 'Panel Title' ),
        'description'	   => __( 'Panel Description' ),
        'capability' 	   => 'edit_theme_options',
    )
);
The ability to add a new panel to your top level hierarchy came in WordPress 4.0. While you can do this, it’s not recommended for your themes. Panels should provide a specific contextual areas of WordPress like Menus and Widgets. If you’re creating a plugin that has several sections about one specific area then it would be a good option.
The priority determines the placement in the top level hierarchy. Each section and panel already added by WordPress has their own priority, and we’ll see a list of those later.
For themes it is recommended to use the default sections and create your own sections based on the content you are changing.
Adding a Section
$wp_customize->add_section(
    'section_id',
    array(
        'priority'        => 10,
        'title'           => __( 'Section Title' ),
        'description'     => __( 'Section Description' ),
        'panel'           => '',
        'active_callback' => '',
    )
);
Sections hold one or many controls. You can add your own controls to the core sections or create your own. In most cases your section only needs a couple parameters. Title and perhaps priority if you have a particular place you want to place the section. By default your sections begin below the core sections.
The panel property is only needed if you want to include this section in a specific panel. Also the active_callback property is only needed if you want to display it based on other factors. We’ll cover active_callback more in a bit.
The sections and panels in WordPress core are as followed:
| Title | ID | Priority (Order) |
|---|---|---|
| Site Title & Tagline | title_tagline | 20 |
| Colors | colors | 40 |
| Header Image | header_image | 60 |
| Background Image | background_image | 80 |
| Menus (Panel)* | menus | 100 |
| Widgets (Panel) | widgets | 110 |
| Static Front Page | static_front_page | 120 |
If you want to add to or remove a section you can access it with the ID. If you want to remove the Menu panel it requires more than just remove_panel(‘menus’). Check out this stack overflow article for more information on removing the panel.
Adding a Setting and Control
$wp_customize->add_setting(
    'setting_id',
    array(
        'type' => 'theme_mod',
        'capability' => 'edit_theme_options',
        'theme_supports' => '',
        'default' => '',
        'transport' => 'refresh',
        'sanitize_callback' => '',
        'validate_callback' => '',
    )
);
Settings handle the live-previewing, saving, sanitation and validation.
- Type is how it’s saved into the database
- Capabilities are who has access to the setting
- Theme Supports not commonly necessary
- Default is a default value to display
- Transport controls live previewing options
- Sanitize_Callback will sanitizing the value before it saving to the database
- Validate_Callback will confirm the value before attempting to save
$wp_customize->add_control(
    'setting_id',
    array(
        'priority' => 10,
        'label' => _( 'Control Label' ),
        'description' => _( 'Control Description' ),
        'type' => 'text',
        'section' => 'section_id',
        'input_attrs' => array(),
        'active_callback' => '',
    )
);
The Control creates the User Interface that the user will interact with to make changes.
- Type creates the UI for the customizer
- Section is the section the control should appear in
- Input_Attrs are attributes you can give to the Input HTML element.
- Active_Callback is a contextual control of display
The control type property tells the Customizer what type of UI to generate for the user. This could be a textbox, a set of radio options, or even an image selector. There are many basic and advanced types built into core, here are most of the basic ones:
| text | textarea | date |
| range | url | |
| password | hidden | checkbox |
| radio | select | dropdown-pages |
| number | time | datetime |
| week | search |
Advanced types need a little extra work to use and we’ll cover those in a moment. You can also create your own types.
theme_mod vs. option
While the control type creates the ui for the user, the setting type tells the Customizer how the input saves to the database.
theme_mod
Settings saved with theme_mod are tied to the current active theme. Each time you activate a theme WordPress creates a new row in the wp_options table as theme_mods_THEMENAME. All your settings using theme_mod save into an array in this row. This is the default for all settings that you add to the Customizer.
When you change your theme you’ll lose all these changes, but when you switch back everything returns.
option
The option type will save each setting in the wp_options table. The setting ID you assign will be the name of the new table row. This type is not recommended by WordPress for Customizer settings added to themes. If you change your theme the settings will stay. If you’ve added the settings to the Customizer in your theme than the options will not be visible to the user.
If you want to add settings to the Customizer that will work for the user cross-themes you should use a plugin.
Transport Property
The transport property is how the customizer previews new values.
Refresh
Using a full page refresh is the default property for new settings. This was all we had when Customizer became a part of core. The good thing about refresh is it is accurate and doesn’t need any extra code to get working. The user changes the value in the Customizer and the preview screen refreshes to show the changes.
The downside is the page refreshes after every little change. And if the page has a lot of elements the load time could be slow and annoying for the user.
postMessage
With postMessage any change no longer triggers a full page refresh. Instead the Customizer makes an asyncronous request. The new values go to the preview window and you need to update the preview using Javascript. Seeing the updates live gives a better user experience. But it does need a little more setup and in some cases you are duplicating your logic to render the page.
Transport properties in action
Below is a simple example of a user updating a text field and how it updates using the two transport types.


Using postMessage
To utilize the live updating of postMessage we’ll need to enqueue a Javascript file using the customize_preview_init hook. This way our file is only loading when using the Customizer.
function thememod_preview_js() {
     wp_enqueue_script(
        'custom_css_preview',
        'path/to/file.js',
        array( 'customize-preview', 'jquery' )
     );
 }
 add_action( 'customize_preview_init', 'thememod_preview_js' );
When you enqueue the file you’ll need to include two dependencies, jQuery and customize-preview. The later will include the Customize Manager Object that will give us access to the Customizer settings.
Here is some boilerplate Javascript that you can use to set up your postMessage setting.
( function( $ ) {

  wp.customize( 'setting_id', function ( value ) {
    value.bind( function( to ) {
      $( '#custom-theme-css' ).html( to );
    } );
  } );

} )( jQuery );
The wp object gives us access to the customize method in our Javascript. This is similar to the $wp_customize->method we were using in PHP.
Here we pass in the setting_id and a callback function. The callback function takes the value which is the original value. We use bind so that when it changes we target a CSS selector and update the html to the new value.
You could also use this to update CSS or toggle a class. You could do more complicated logic, but you don’t want to go overboard with postMessage. There is a new tool since WordPress 4.5 that makes updating complicated logic easier, and that is Selective Refresh.
Selective Refresh
Added in WordPress 4.5 we can now refresh just an area that we have linked to a setting. This is less disruptive than a full frame refresh. It also allows you to use the same PHP that you wrote to add the elements to the page in the first place.
To use Selective Refresh you need to register a partial that creates a link between your setting and a CSS Selector on your page.
NOTE: This partial is different than a PHP partial that we might include in a page as part of a template part.
$wp_customize->selective_refresh->add_partial(
     'partial_id',
     array(
         'settings' => 'partial_id'
         'selector' => '#css-selector',
         'container_inclusive' => false,
         'render_callback' => function() {
             // function name or php logic
         },
         'fallback_refresh' => true
    )
 );
Creating a partial is like adding a setting except that you use the selective_refresh method as well as the add_partial method of that object.
You give your partial an ID, and you also declare this same ID in the settings parameter. But if you don’t include the settings parameter it will default to what you have already set as the partial ID.
- Selector is the element in the page that we want to link to. If you use a selector that has many entities on the page it will only select the first one.
- Container Inclusive is a booleon value. True means that you want to refresh the parent node as well as it’s children instead of just the children.
- Render Callback is your PHP logic to update the page. You could do an anonymous function, or pass in the name of a function you have already created.
- Fallback Refresh simple says that if it can’t find the CSS selector than it will do a full page refresh.
Note that you’ll need to keep your transport property set to postMessage. Otherwise the preview will perform a full page refresh no matter what.
A Selective Refresh Example
Lets take a closer look at creating a new setting that uses Selective Refresh. Selective Refresh allows us to do more than just update a value. We can render our content through a function and see the effect update.
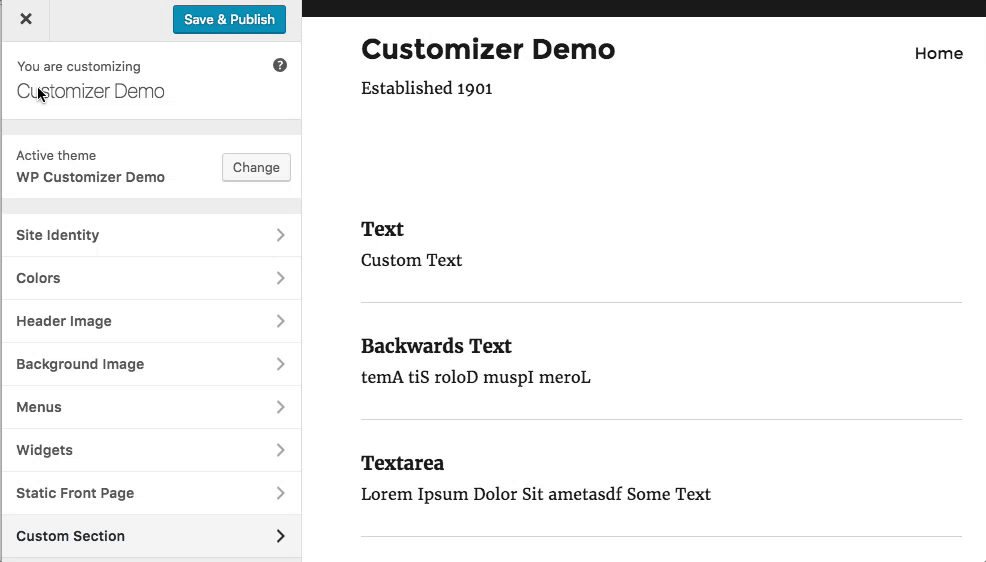
First we need to add a setting and a control to work with:
$wp_customize->add_setting(
     'backwardstext_setting_id',
     array(
         'capability' => 'edit_theme_options',
         'transport' => 'postMessage',
         'default' => 'Lorem Ipsum',
     )
 );

 $wp_customize->add_control(
     'backwardstext_setting_id',
     array(
         'type' => 'text',
         'priority' => 10,
         'section' => 'custom_section',
     )
 );
Then we add our partial
$wp_customize->selective_refresh->add_partial(
    'backwardstext_setting_id',
    array(
        'selector' => '.backwards-text',
        'render_callback' => 'ajs_customizer_partial_backwardstext',
    )
);
You’ll notice a couple things when you look at these example code blocks. First, I use the same ID for my Control, Setting, and Partial. This works, and I prefer it to better organize my code.
Next I reference a new function called ajs_customizer_partial_backwardstext. Let’s make that now.
function ajs_customizer_partial_backwardstext() {
    echo strrev(get_theme_mod('backwardstext_setting_id'));
}
I’m getting the value of my setting from the database. Then reversing the string and echoing out the content. I’ve used this function in the page template to display the initial value.
This isn’t a practical example. But it shows you that the content is rendering through my function. Here’s what it looks like as I update the value in the Customizer.

Only the paragraph tag that has the class .backwards-text is refreshing. It’s using my function to reverse the string before it prints it to the screen.
More Selective Refresh Benefits
Now that we have a link created between the WordPress Customizer control and a section of the page we have a few more features that Selective Refresh adds.
The first allows you to shift-click on the element in the preview window and the Customizer will jump to and focus on that setting.
This is great, but it’s not obvious. I expect more work done to let users know about this feature either with hover states on partials or indicators next to the partial.
There is another benefit, but it deals with Validation which we’ll get to in a little bit.
Contextual Controls
Sections and Controls both have the active_callback parameters to control when displayed.
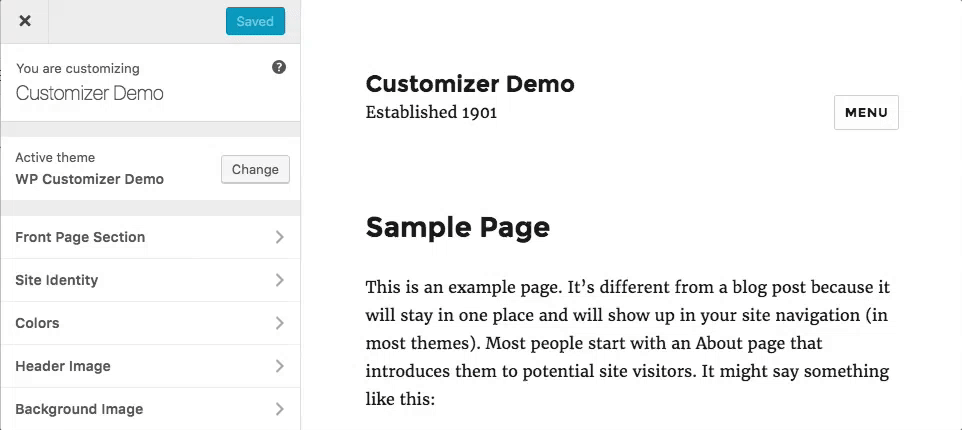
The above example shows a Front Page Section that disappears when the Customizer Preview changes to a different page. When you are in a section that becomes no longer visible the Customizer Panel moves back to the main panel.
'active_callback' => 'is_front_page'

// or

'active_callback' => function() {
    return is_page();
}
The parameter can take either the name of a function, or an anonymous function as long as it returns a truthy value. WordPress includes many conditional functions that you can use like my use of is_front_page above.
You can do this with an entire section, or just an individual control. You can also base the context not on a page, but on the value of another control.
Otto has a great example that I used during my talk, but you can read about it on his page.
Customizer Sanitization
Any content that you let users add to the database must be sanitized. WordPress has some built in functions that you can use, but to be as safe as possible it would be better to create your own sanitization function.
Here’s an example of using a WordPress function:
'sanitize_callback' => 'sanitize_text_field'This would work great for simple text fields or text areas. There is also sanitize_hex_color for other simple customizer values.
But if you have a radio or select field there isn’t a default way to know what your values are to sanitize them. Let’s set up a radio setting and sanitization function.
$wp_customize->add_setting( 'radio_setting_id', array(
    'default' => 'blue',
    'sanitize_callback' => 'thememod_customizer_sanitize_radio',
) );

$wp_customize->add_control( 'radio_setting_id', array(
    'type' => 'radio',
    'section' => 'custom_section',.
    'label' => __( 'Custom Radio Selection' ),
    'description' => __( 'This is a custom radio input.' ),
    'choices' => array(
        'red' => __( 'Red' ),
        'blue' => __( 'Blue' ),
        'green' => __( 'Green' ),
    ),
) );

function thememod_customizer_sanitize_radio( $input ) {
    $valid = array(
        'red' => __( 'Red' ),
        'blue' => __( 'Blue' ),
	'green' => __( 'Green' ),
    );

    if( array_key_exists( $input, $valid ) ) {
	return $input;
    } else {
	return '';
    }
}
We’ve added a control with three radio options, red blue and green. We also declared our sanitize_callback and wrote the function below. This function takes the $input of what the user entered in the field.
In our sanitize function we first setup a new array of what the valid responses could be. This would be dependent on your own options. Then we check if the array key from the input value is found within that valid array. If it is we return it, otherwise we return an empty string.
One problem with Sanitization is when the input is bad an unexpected value returns. Another example could be the user didn’t input a correct email address. The sanitized value saves and the user isn’t given an information about what went wrong. Validation added in WordPress 4.6 fixes this problem.
Customizer Validation
Validation checks the validity of the values. If an error occurs it returns the dirty values, notifies the users, and the data is never sent to the database. In fact if one setting has a validation error nothing saves.
The Customizer also jumps to a section that has a validation error if the user has moved to another panel or section in the Customizer.
Lets take a look at an example from the WordPress handbook, setting up an established year setting.
'validate_callback' => 'validate_established_year'

//

function validate_established_year( $validity, $value ) {
    $value = intval( $value );
    if ( empty( $value ) || ! is_numeric( $value ) ) {
        $validity->add( 'required', __( 'You must supply a valid year.' ) );
    } elseif ( $value < 1900 ) {
        $validity->add( 'year_too_small', __( 'Year is too old.' ) );
    } elseif ( $value > gmdate( 'Y' ) ) {
        $validity->add( 'year_too_big', __( 'Year is too new.' ) );
    }
    return $validity;
}
We pass in two variables to our Validation function, $validity and $value.
The $value is what the user entered into the control similar to Sanitation. $validity will add any errors that occur in the validation, if it returns empty than no validation errors have occurred.
In this example we first do a little sanitation making sure the value is positive integer. Then we check to make sure it is a number. If not we use the $validity->add method with two parameters. The first is the id of the error, the next is the text displayed to the user in a notification.
After checking to make sure the value exists, we check if it is lower than 1900 or greater than the current year. $validity return errors if either are true.
You can do this with any of your settings. This adds a level of communication with users as they add content to the Customizer.
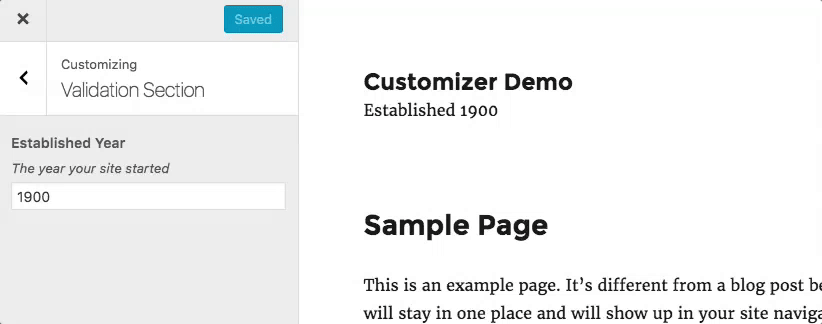
Here is that example in action. When I hit Save & Publish the Customizer jumps back to the section that had the error and gives me the notification. When I fix the error and click Save again, the notification goes away. The Saved & Publish button changes to Saved, showing the save was successful.
It would be better if the error went away as soon as the user fixed the issue instead of having to hit save and publish the changes.
This is possible and it’s thanks to Selective Refresh
Validation with Selective Refresh
Earlier I mentioned that Selective Refresh creates a link between the preview and the control. Every time the refresh occurs the control goes through validation.
When an error occurs the notification will appear and the dirty value will remain in the input. However in the preview it will revert to the last saved value.
After the user fixes the error than the Customizer removes the notification.
Lets set up selective refresh with the above example.
$wp_customize->selective_refresh->add_partial(
    'established_year',
    array(
        'selector' => '.established-year',
        'render_callback' => 'thememod_established_year',
    )
);

function thememod_established_year() {
    echo get_theme_mod('established_year');
}
First I register the partial for the established year setting and assign a css selector to link with the page. I have a span tag with this class that wraps around the year.
My render callback is simple echoing the value from the database.
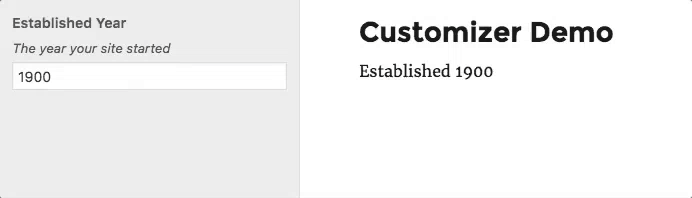
As soon as I make the date too old or too new the error notification appears and the value in the preview reverts to 1900, which was the last saved value.
The Future of the WordPress Customizer
The Customizer has seen lots of improvements over the past few versions. As I’m writing up this post 4.7 is nearing completion and it’s adding even more. Here is the slate:
- Customize Changesets (transactions)
- Create pages in menus
- Improve sliding panel UI
- Custom CSS
Changesets will be a big change. They will allow you to save a draft of your customizations and share those changes with another person before publishing. Also Custom CSS in the core Customizer will be a great addition for small theme-specific CSS. Many people already use plugins to add this functionality and Jetpack has had this as well. The main challenge that be the difference between a theme-specific and site-specific changes used to add styling.
I will write up more about these changes when 4.7 launches.
Missing Pieces
Having now done my talk and written this companion piece I found quite a few things that I should have included. I didn’t talk much about using Javascript to connect to the Customizer API. I also didn’t do much with advanced types like Image Uploads.
As I dig into the Customizer I plan to write more posts about all the features and tools available. I’ll also write about new features that get added to any future releases.
Until then, Happy Customizing.
5 Comments
Hay Anthony,
Your article covers lot of things of customizer. Thanks for writing.
This was great. I was having a hard time figuring out what to do with the render_callback after adding a partial. The example function that echoed the setting was what I was exactly what I was searching for.
Same here! This gets lost in a lot of other tutorials.
I was wondering, if it’s just outputting a basic settings and there’s no special function required (like the established_year function shown), is render_callback in the selective_refresh and echoing the function even necessary? It seems to work the same for me without it.
Thanks!
Hi Troy, thanks for checking out my post.
I did a little testing with your question and found that without a render_callback in the selective_refresh partial it will default back to a full page refresh. So yes it works, but it defeats the purpose of adding the partial.
Here’s what I did for this test:
In my template-parts/site-branding.php of twentyseventeen I added to the end of the site description.
If you wanted you could do the render_callback as an anonymous function that just echo’s the theme_mod instead of creating a new function. In my examples I used the more extensive way to do it with simple example so it wouldn’t be complicated, but would give you the direction to go if you wanted to make something more complicated.
Hopefully that answers your question, if your example works without the full page refresh than I may have done something differently. Honestly I meant to keep up with working on the Customizer more but I just switched jobs and I’m a little rusty. ><
Hay Anthony,
Really Awesome blog, for me it covers everything.
Thank You